
- Reduces waste disposal costs.
- Raises worms for fishing.
- Has no foul smell or pests.
- Provides a convenient method for converting kitchen vegetable wastes into a rich
organic fertilizer for
house and garden plants.
A worm composing system can be easily started by following these five steps:
- MAKE OR GET A WORM BIN
Wooden, plastic or metal boxes or tubs may be used. The container should be
8"-12" deep and of a
size to accommodate the amount of garbage you produce. Approximately one square foot of surface
area is needed for each pound of kitchen vegetable wastes per week. For example, a 1'×
2' × 3' box will
serve a family of 4 to 6. Detailed instructions for constructing your own bin are
included and more help
may be obtained through the Master Composter program, 747-0242.
- ADD BEDDING
Bedding holds moisture and provides a medium in which the worms can work
and the garbage can be buried.
It must be light and fluffy enough to allow air exchange.
Worms actually consume bedding as well as the kitchen vegetable wastes.
Bedding can be made of shredded newspaper, shredded corrugated cardboard,
peat moss, or leaf mold.
Bedding must be well soaked in water and wrung out before adding to the bin.
You may add a handful of dirt every time the bedding is changed although
it is not necessary.
- ADD WORMS
Red worms are the most satisfactory and efficient type of worm to use
for composting. The worms need adequate temperature, moisture and
ventilation. The optimum temperature Is from 55-77 degrees.
Remember, an active worm bin must be kept in a heated garage or basement
during the winter to prevent freezing. The worm population increases
(or decreases) according to how well they are fed. To determine the
number of worms needed to populate a bin, figure one pound of worms
for each pound of kitchen vegetable wastes produced per day. Worms
process their own body weight of organic matter each day.
- BURY GARBAGE
Kitchen vegetable waste which can be composted includes vegetable
and fruit scraps, egg shells, bread products, coffee grounds and
tea leaves. Meat, bones, fats, and dairy products should not be
composted. It may be helpful to keep a plastic container near the
kitchen sink to collect scraps. Keeping the container uncovered
will prevent odors but may attract fruit flies. About twice a
week, the contents may be buried in the worm bedding, rotating
around the box utilizing a different area each time. Be sure to
cover all of the worm food with bedding. If your bedding dries
out a sheet of black plastic can be laid over the surface to
retain moisture.
- HARVEST COMPOST
While there are several methods of harvesting compost and adding
new bedding, the most convenient is to move the compost to one side
of the bin and add new bedding and garbage to the other. Replacing
the plastic sheet on only the half of the bin containing the new
bedding will allow the compost to dry out some. The worms will
migrate to the fresh material and the compost may be removed and replaced
with new bedding. This migration may take several weeks.
Note: Kitchen vegetable wastes compost well in a worm bin
and yield valuable worm castings compost. When adding kitchen
vegetable waste to your outdoor compost pile you can create odors
and attract vermin and other unwanted visitors if the wastes are
not buried in the middle of the compost bin. Be especially careful
if you add kitchen vegetable waste to a compost bin. Burying kitchen
waste in the ground causes similar problems
 This system is designed for composting vegetable food wastes using
red worms. Food wastes and worms are “bedded” in shredded
and moistened newspaper, cardboard, peat or brown leaves. The worms
turn both food wastes and bedding into a high-quality compost
suitable for use on house plants, seedlings or general garden use.
This system is designed for composting vegetable food wastes using
red worms. Food wastes and worms are “bedded” in shredded
and moistened newspaper, cardboard, peat or brown leaves. The worms
turn both food wastes and bedding into a high-quality compost
suitable for use on house plants, seedlings or general garden use.
To maintain this system simply rotate burial of food wastes
throughout the bin. Every 3-6 months compost should be moved to one
side of the bin and new bedding added to the empty half. At this
time start burying wastes in the new bedding only. Within one
month worms will populate the new bedding, finished compost may be
harvested and the rest of the bin can be rebedded. During the winter,
worm bins should be kept in a cool indoor space such as a basement or warm
garage to avoid freezing. A properly maintained worm bin is odorless.
Bins may be placed in a shady outdoor space the remainder of the year.
Flies may be controlled by placing a sheet of plastic over the bedding.
This bin can be built for about $35 with new wood and hardware, or
less using recycled materials such as old wood boxes or other containers.
Any worm bin must have drains I\in the bottom and a tight fitting lid
to keep moisture in and pests out. If you plan to bring your bin
into your living area, place a layer of remay (also known as row cover),
on the bottom of the bin, before adding the bedding. A starter batch
of worms may be purchased at a small additional cost, or find some in
an old compost pile.
| Materials: | Tools:
|
| 1 ½" treated sheet of plywood |
Tape measure, skill saw or rip hand saw,
hammer, saw horses, long straight edge
or chalk snap line, screwdriver, and drill
with ½" bit.
|
1 12 foot 2'×4
|
1 16 foot 2'×4
|
2 lbs. 6d galvanized nails
|
½ lb. 16d galvanized nails
|
| 2 galvanized door hinges | Use eye and ear protection.
|
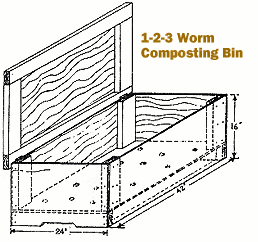
alignMeasure and cut plywood as indicated in drawing above. Cut the 12
foot 2'×4 into five pieces: two 39", two 23", and one 20"
long. Nail the 2'×4s together on edge with two 16d nails at each joint as
illustrated in the Base Frame diagram. Nail the plywood base piece onto
the 2'×4 frame.
Cut four 1 foot lengths out of the 16 foot 2'×4. Take each plywood
side piece and place a one foot 2'×4 under each of it’s ends so
that the 2'×4 is flush with the top and side edges of the plywood, and
nail the boards into place. Nail the side pieces onto the base frame.
To complete the box, nail the ends onto the base and sides. To
reinforce the box make sure there is a nail staggered at least every 3
inches wherever plywood and 2'×4s meet. Drill twelve ½" holes
through the bottom of the box for drainage.
To build the lid, take the remaining 12 foot 2'×4 and cut it into
two 45" pieces and two 20" pieces and lay them flat
(short pieces on the inside as indicated in diagram above)
so that the plywood top is inset from the edges of the 2'×4 by
1-½" all the way around the perimeter. Nail the plywood
onto the 2×4 securely. Place the hinges on the backside of the
box at both ends on the 2'×4s, and on the under side of the 2'×4
lid frame, so that the lid will stand upright when opened.